Data ingest and monitoring
Introduction
In this session you will learn various ways to ingest data into your wis2box and learn how you can monitor if your data is being ingested without errors.
preparation
Download test-data
Download the following file onto your local computer:
WIGOS_0-454-2-AWSBILIRA_2023-06-01T1055.csv
Verify data mappings
Ensure you are logged into the wis2box-management container on your student VM:
python3 wis2box-ctl.py login
Open your data mappings file:
vi $WIS2BOX_DATA_MAPPINGS
Question
Which plugins are configured for your dataset ?
Open the Grafana dashboard
Open the Grafana dashboard home-page at http://<your-host>:3000
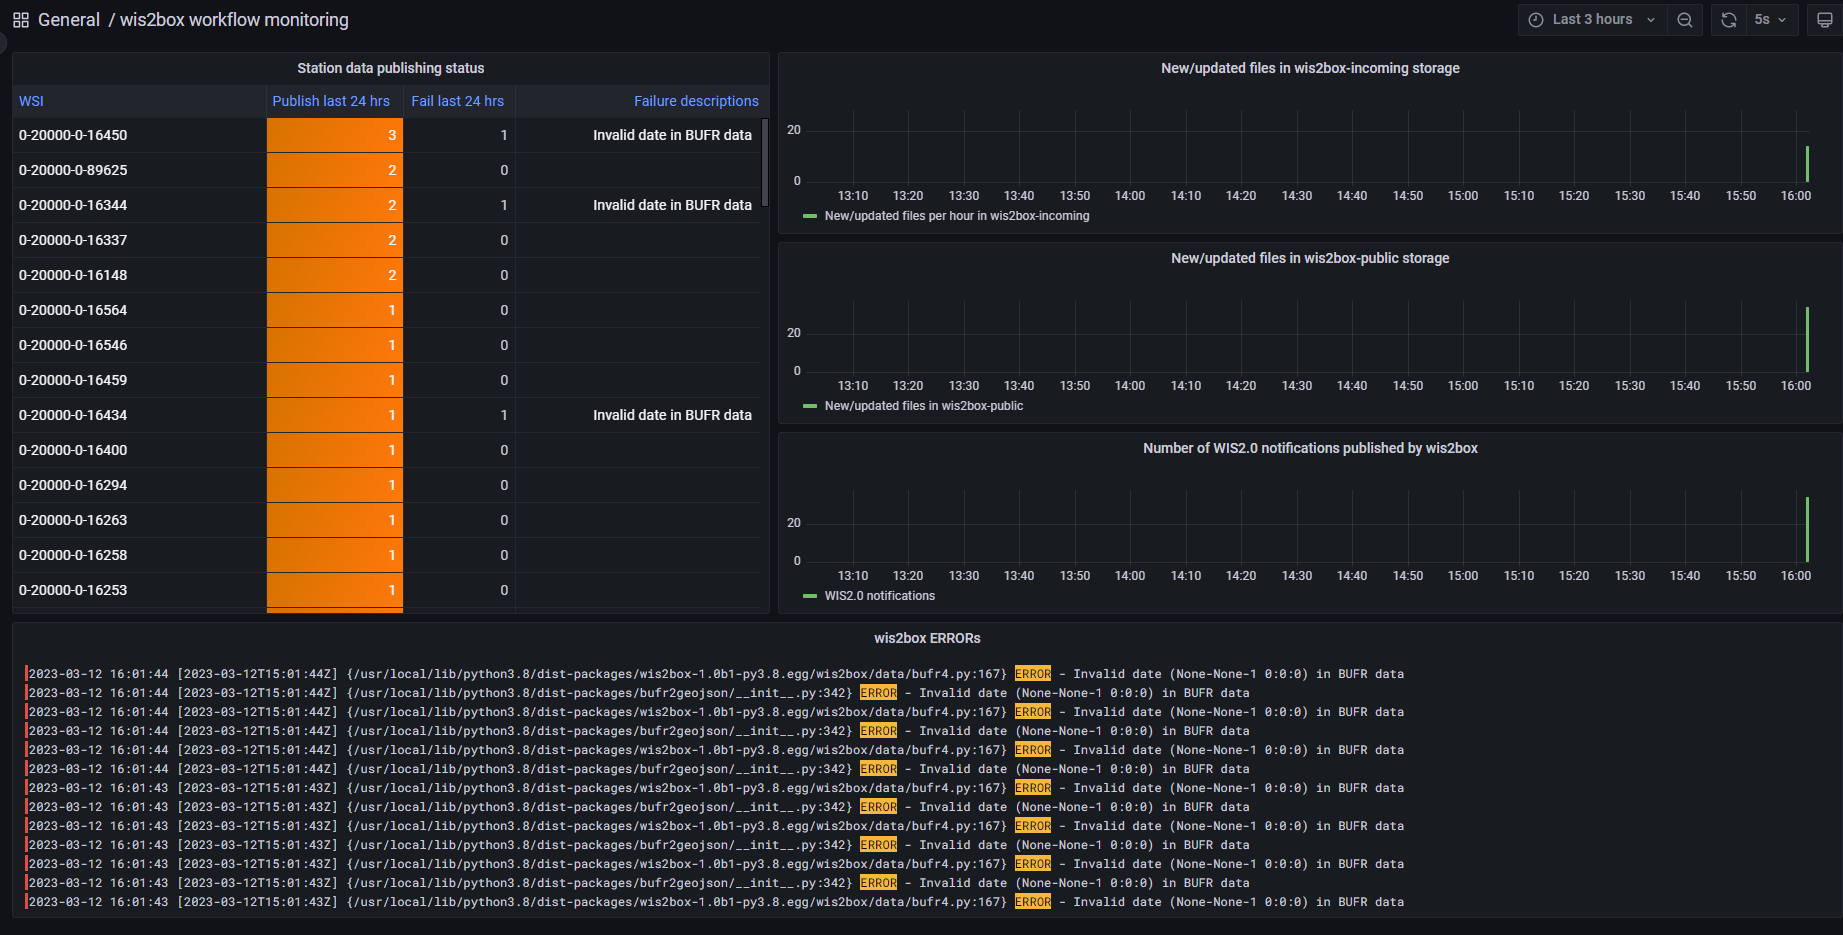
Question
Are there any errors reported so far?
Have there been any WIS2 notifications published in the last 24 hours?
Keep a web browser tab open with the Grafana dashboard during the next few exercises to monitor the status of your data publishing.
Ingesting your data into wis2box
You can use multiple methods to ingest data into wis2box and start publishing notifications to WIS2. Previously you used the wis2box data ingest command from within the wis2box-management container, which requires the data to be available on the wis2box-instance.
Another method for manually ingesting data is to use the MinIO admin interface to upload a file into the wis2box-incoming bucket.
If your data-collection software supports sending data to an FTP-endpoint you could use the optional wis2box-ftp container setup.
You can also automate data ingest using a script to copy data into the wis2box-incoming bucket at regular intervals, for example using Python and the MinIO-client.
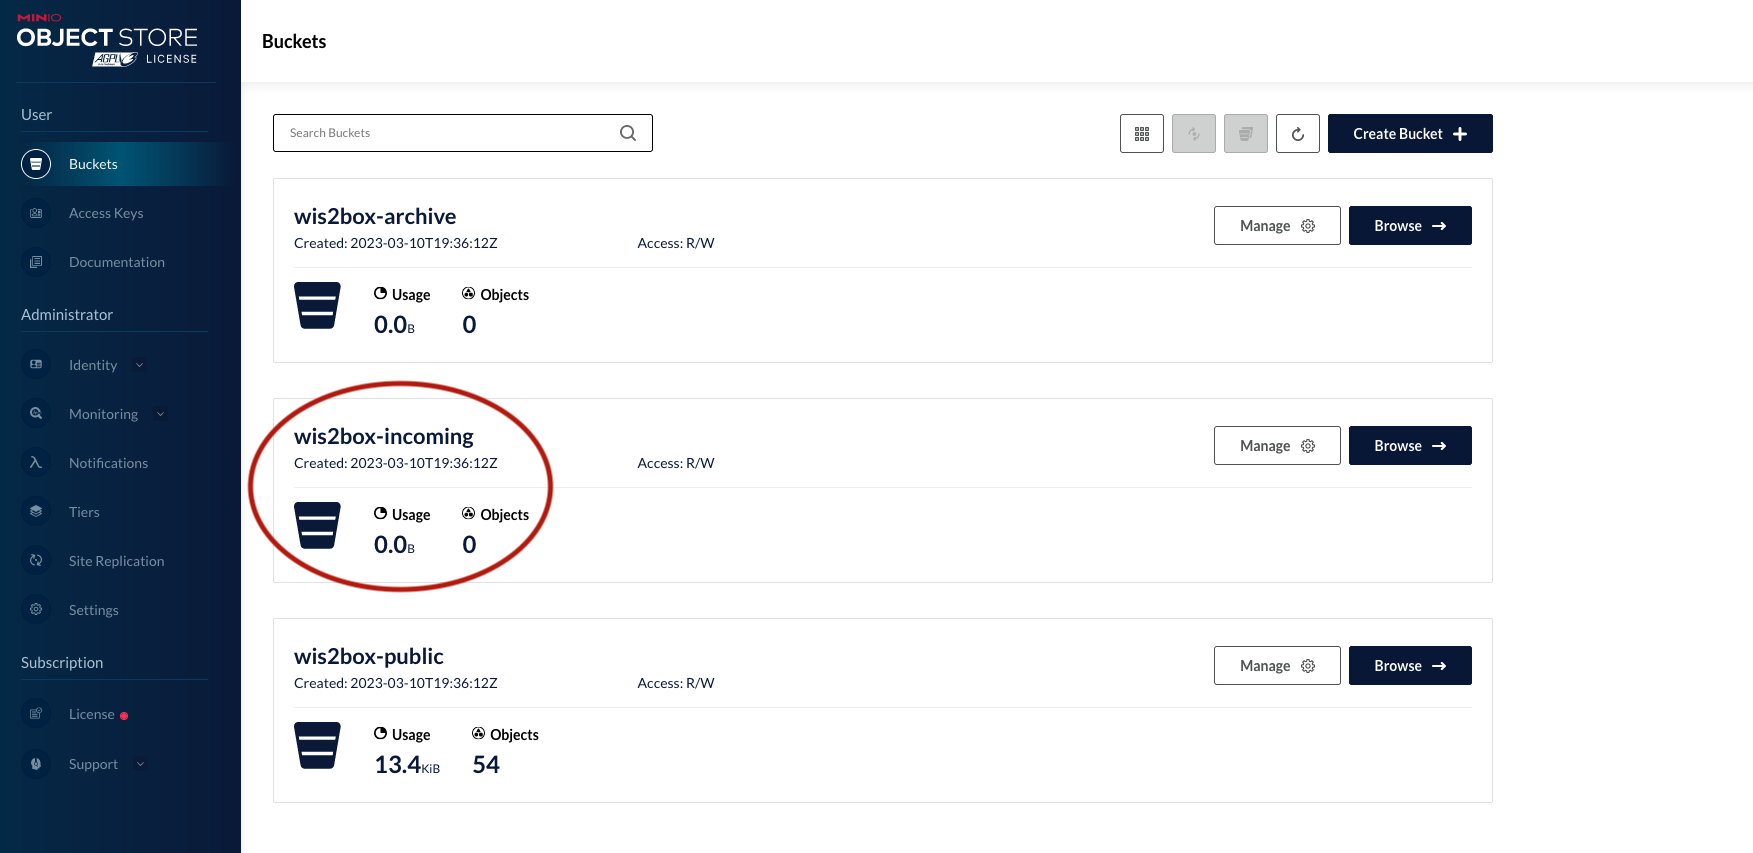
MinIO admin interface
Open a new tab in your web browser and visit the page `http://
You should be see the buckets 'wis2box-archive', 'wis2box-incoming', 'wis2box-public'.
You can click 'browse' to view the contents of the buckets.
Navigate to the wis2box-incoming bucket:
Click the Create new path button:
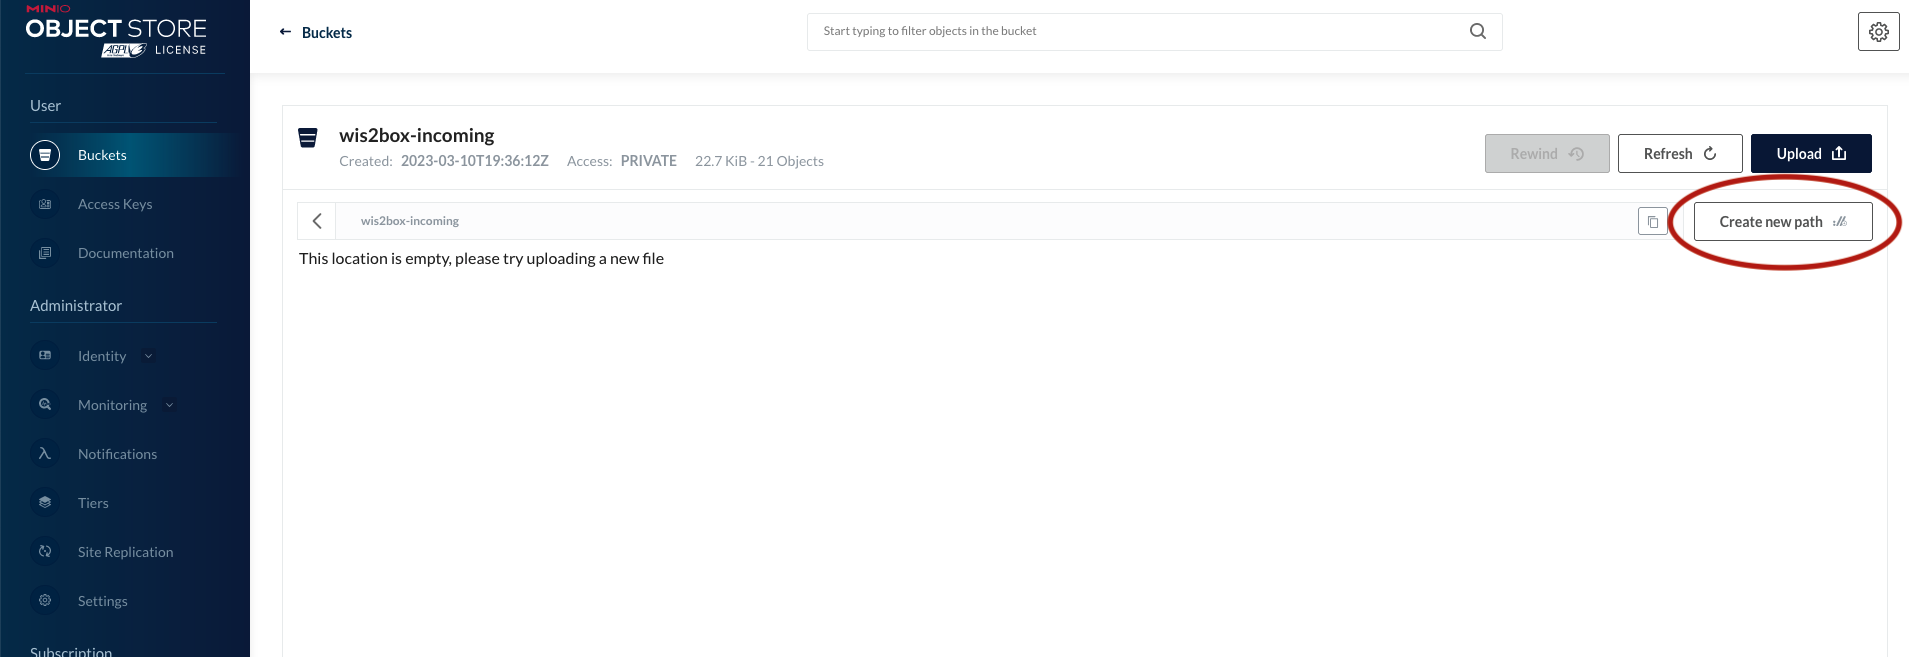
Create the following path '/test/data/':
And then upload the file 'WIGOS_0-454-2-AWSBILIRA_2023-06-01T1055.csv' into the folder 'wis2box-incoming/test/data'
View the Grafana dashboard
Check the Grafana dashboard and find the error reported after uploading the file.
Navigate the directory structure until you are in the folder 'wis2box-incoming/mwi/mwi_wmo_demo/data/core/weather/surface-based-observations/synop':
Upload the file 'WIGOS_0-454-2-AWSBILIRA_2023-06-01T1055.csv' it to 'wis2box-incoming/mwi/mwi_wmo_demo/data/core/weather/surface-based-observations/synop'
View the Grafana dashboard
Check the Grafana dashboard; can you confirm the wis2box workflow was initiated after you uploaded your data? In case you see any errors, try to use the information provided in the dashboard to resolve the errors.
View new messages on your wis2box-broker
Check MQTT-explorer, can you confirm that new messages were successfully published on your wis2box-broker?
Note
The wis2box interprets the folder-structure in the wis2box-incoming as the corresponding topic-hierarchy for the file.
mwi.mwi_wmo_demo.data.core.weather.surface-based-observations.synop
corresponds to the path:
mwi/mwi_wmo_demo/data/core/weather/surface-based-observations/synop.
If there are no data-mappings defined for the topic-hiearachy corresponding to the directory that received data, wis2box will not initiate the workflow.
wis2box FTP
To allow your data to be accessible over FTP you can use the 'wis2box-ftp' image. This container provides a service that forwards data received over FTP to MinIO.
docker-compose -f docker-compose.wis2box-ftp.yml --env-file ftp.env up -d
To test the FTP service, you can use WinSCP on your local laptop and prepare the connection to the wis2box-ftp container as follows:
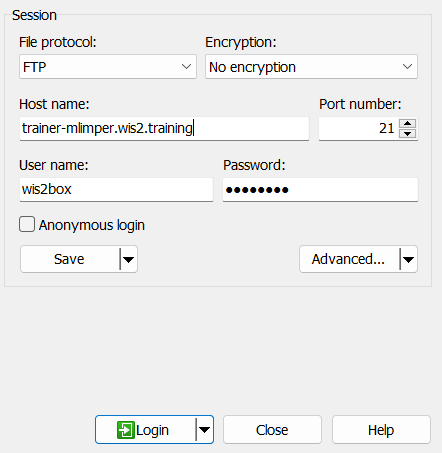
Replace "Host name" with that of your student VM and use the username and password for the FTP as specified by FTP_USER and FTP_PASSWORD in your ftp.env file.
Once you have established the connection you will land in an empty directory.
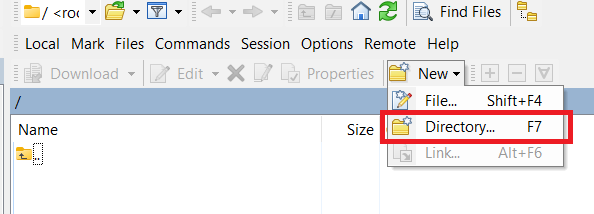
Select the option to create a 'new directory':
Enter the topic hierarchy value of your dataset as a directory:

Now enter the directory you created and you can copy your data sample from your host machine to trigger the wis2box data ingest.
Check your Grafana dashboard.
Question
Did you manage to successfully publish WIS2 notifications for your data?
If not, review the errors reported and try to determine what went wrong.
Note
You can run docker logs wis2box-ftp to check if the FTP service is running correctly.
Note
To change the username/password for the wis2box-ftp edit the file ftp.env and set your own values for FTP_USER and FTP_PASS:
FTP_USER=wis2box
FTP_PASS=wis2box123
docker-compose -f docker-compose.wis2box-ftp.yml down
docker-compose -f docker-compose.wis2box-ftp.yml --env-file ftp.env up -d
Then start the wis2box-ftp service with the following command:
MinIO Python client (optional exercise)
You may want to automate data ingestion from your system into wis2box using Python-scripts
MinIO provides a Python client which can be installed as follows:
pip3 install minio
On your student machine the 'minio'-module for python will already be installed.
Go to the directory exercise-materials/wis2box-setup and run the example script using the following command:
cd ~/exercise-materials/wis2box-setup
python3 examples/scripts/copy_to_incoming.py
Note
The sample script needs to be modified before it can be used.
The script needs to know the correct endpoint for accessing MinIO on your wis2box. If wis2box is running on your host, the MinIO endpoint is available at http://<your-host>:9000.
The sample script provides the basic structure for copying a file into MinIO. Try to ingest a data sample of your choosing using this script.
ingest data using Python
Use the Python example provided to create your own Python script to ingest data into your wis2box.
Ensure that you:
- define the correct MinIO endpoint for your host
- define the correct path in MinIO for the topics defined in your data-mappings.yml
- determine the correct local path where the script can access the data to ingest
Ensure that the script runs correctly and new data notifications are published on your wis2box broker. Review and correct any errors reported on the Grafana dashboard:
Conclusion
Congratulations!
In this practical session, you learned how to:
- trigger wis2box workflow using different data ingest methods
- monitor the status of your data ingest and publishing